![]()
Shotover Proxy is an open source, high performance L7 data-layer proxy for controlling, managing and modifying the flow of database requests in transit. It can be used to solve many different operational and interoperability challenges for teams where polyglot persistence (many different databases) is common.
The following pages are a good place to learn more:
- Introduction for more information on what Shotover Proxy is, why it exists and some of the underlying philosophies behind it.
- Getting started guide for details on how to jump straight in and get up and running.
- Concepts for a deeper dive into some of the fundamental shotover concepts.
Deploying Shotover
Shotover can be deployed in a number of ways, it will generally be based on the problem you are trying to solve, but they all fall into three categories:
- As an application sidecar - Shotover is pretty lightweight, so feel free to deploy it as a sidecar to each of your application instances.
- As a stand alone proxy - If you are building a Service/DBaaS/Common data layer, you can deploy Shotover on standalone hardware and really let it fly.
- As a sidecar to your database - You can also stick Shotover on the same instance/server as your database is running on, we do it, so we won't judge you.
Roadmap
- Support relevant xDS APIs (so Shotover can play nicely with service mesh implementations).
- Support hot-reloads and a dynamic configuration API.
- Additional sources (DynamoDB and PostgreSQL are good first candidates).
- Add support for rate limiting, explicit back-pressure mechanisms, etc.
- Additional Distributed algorithm transform primitives (e.g RAFT, 2PC, etc).
- Additional sink transforms (these generally get implemented alongside sources).
- Support user-defined / generated sources (e.g. thrift or a gRPC service from a proto definition).
- Simulation testing once tokio-rs/simulation reaches compatibility with tokio-2.0
- zero-copy pass-through transforms and in-place query editing (performance).
Name
Shotover refers to the Shotover (Kimi-ākau) river in Otago, New Zealand - close to Queenstown and eventually flowing into Lake Wakatipu via the Kawarau River, it's famous for white water rafting, bungy-jumping, fast rapids and jet boating.
Introduction
Use Cases
The majority of operational problems associated with databases come down to a mismatch in the suitability of your data model/queries for the workload or a mismatch in behaviour of your chosen database for a given workload. This can manifest in many different ways, but commonly shows up as:
- Some queries are slow for certain keys (customers/tenants etc).
- Some queries could be implemented more efficiently (queries not quite right).
- Some tables are too big or inefficient (data model not quite right).
- Some queries are occur far more than others (hot partitions).
- I have this sinking feeling I should have chosen a different database (hmmm yeah... ).
- My database slows down over time (wrong indexing scheme, compaction strategy, data no longer fits in memory).
- My database slows down for a period of time (GC, autovacuum, flushes).
- I don't understand where my queries are going and how they are performing (poor observability at the driver level).
These challenges are all generally discovered in production environments rather than testing. So fixing and resolving these quickly can be tricky, often requiring application and/or schema level changes.
Shotover aims to make these challenges simpler by providing a point where data locality, performance and storage characteristics are (somewhat) decoupled from the application, allowing for on the fly, easy changes to be made queries and data storage choices without the need to change and redeploy your application.
Longer term, Shotover can also leverage the same capability to make operational tasks easier to solve a number of other challenges that come with working multiple databases. Some of these include:
- Data encryption at the field level, with a common key management scheme between databases.
- Routing the same data to databases that provide different query capabilities or performance characteristics (e.g. indexing data in Valkey in Elasticsearch, easy caching of DynamoDB data in Valkey).
- Routing/replicating data across regions for databases that don't support it natively or the functionality is gated behind proprietary "open-core" implementations.
- A common audit and AuthZ/AuthN point for SOX/PCI/HIPAA compliance.
Design principals / goals
Shotover prioritises the following principals in the order listed:
- Security
- Durability
- Availability
- Extensibility
- Performance
Shotover provides a set of predefined transforms that can modify, route and control queries from any number of sources to a similar number of sinks. As the user you can construct chains of these transforms to achieve the behaviour required. Each chain can then be attached to a "source" that speaks the native protocol of you chosen database. The transform chain will process each request with access to a unified/simplified representation of a generic query, the original raw query and optionally (for SQL like protocols) a parsed AST representing the query.
Shotover proxy currently supports the following protocols as sources:
- Cassandra (CQL4 + CQL5)
- Valkey/Redis (RESP2)
- Kafka (Kafka Wire Protocol)
Shotover performance
Shotover compiles down to a single binary and just takes a single YAML file and some optional command line parameters to start up. When running a small topology (5 - 10 transforms, 1 or 2 sources, 200 or so TCP connections) memory consumption is rather small with a rough working set size between 10 - 20mb.
Currently benchmarking is limited, but we see around 100k req/s per single logical core for a 1:1 request model. However due to the way Shotover is implemented, it will largely go as fast as your upstream datastore can go. Each tcp connection is driven by a single tokio thread and by default Shotover will use 4 to 8 OS threads for the bulk of it's work (this is user configurable). Occasionally it will spawn additional OS threads for long running non-async code. These are practically unbounded (as defined by Tokio) but use is rare.
Individual transforms can also dramatically impact performance as well.
Shotover will not try to explicitly pipeline, aggregate or batch requests (though feel free to write a transform to do so!) unless it is built into the source protocol (e.g. RESP2 supports cmd pipelining) or via a transform. Most client drivers support connection pooling and multiple connections, so feel free to ramp up the number of outbound sockets to get the best throughput. Shotover will happily work with 100's or 1000's of connections due to its threading model.
Performance hasn't been a primary focus during initial development and there are definitely some easy wins to improve things.
Getting Started
Setup
- Download & Extract - You can find the latest release of Shotover Proxy at our GitHub release page. So download and extract from there onto your Linux machine. Alternatively you can build and run from source.
- Run -
cdinto the extractedshotoverfolder and run./shotover-proxy. Shotover will launch and display some logs. - Examine Config - Shotover has two configuration files:
config/config.yaml- This is used to configure logging and metrics.config/topology.yaml- This defines how Shotover receives, transforms and delivers messages.
- Configure topology - Open
topology.yamlin your text editor and edit it to define the sources and transforms you need, the comments in the file will direct you to suitable documentation. Alternatively you can refer to the Deployment Scenarios section for fulltopology.yamlexamples. - Rerun - Shotover currently doesn't support hot-reloading config, so first shut it down with
CTRL-C. Then rerun./shotover-proxyfor your new config to take effect. - Test - Send a message to Shotover as per your configuration and observe it is delivered to it's configured destination database.
To see Shotover's command line arguments run: ./shotover-proxy --help
Deployment scenarios
Full topology.yaml examples configured for a specific use case:
Core Concepts
Shotover has a small number of core concepts or components that make up the bulk of it's architecture. Once understood, quite complex behaviour and environments can be managed with Shotover.
Source
A source is the main component that listens for traffic from your application and decodes it into an internal object that all Shotover transforms can understand. The source will then send the message to a transform chain for processing / routing.
Transform
Transforms are where Shotover does the bulk of it's work. A transform is a single unit of operation that does something to the database request that is in flight. This may be logging it, modifying it, sending it to an external system or anything else you can think of. Transforms can either be terminating (pass messages on to subsequent transforms on the chain) or non-terminating (return a response without calling the rest of the chain). Transforms that send messages to external systems are called sinks.
Transform Chain
A transform chain is a ordered list of transforms that a message will pass through. Messages are received from a source. Transform chains can be of arbitary complexity and a transform can even have its own set of sub chains. Transform chains are defined by the user in Shotover's configuration file and are linked to sources.
Topology
A topology is how you configure Shotover. You define your sources, your transforms in a transform chain and then assign the chain to a source.
Configuration
Shotover proxy accepts a two seperate YAML based configuration files. A configuration file specified by --config-file
and a topology file specified by --topology-file
configuration.yaml
The configuration file is used to change general behavior of Shotover. Currently it supports two values:
main_log_levelobservability_interface(optional)
main_log_level
This is a single string that you can use to configure logging with Shotover. It supports env_filter style configuration and filtering syntax. Log levels and filters can be dynamically changed while Shotover is still running.
observability_interface
Shotover has an optional observability interface for you to collect Prometheus data from. This value will define the address and port for Shotover's observability interface. It is configured as a string in the format of 127.0.0.1:8080 for IPV4 addresses or [2001:db8::1]:8080 for IPV6 addresses. To disable metrics reporting for Shotover, do not specify this field. More information is on the observability page.
topology.yaml
The topology file is the primary method for defining how Shotover behaves.
Consider this example topology.yaml:
# This example listens on two different localhost ports and routes messages to a single valkey instance on localhost.
# Requests received on port 1000 will have metrics recorded on the types of messages sent, while port 1001 will not have those metrics.
---
# The list of sources
sources:
  # First we define the source that will listen for connections from the client and then communicate to the client once a connection is opened.
  - Valkey:
      name: "valkey"
      listen_addr: "127.0.0.1:1000"
      # Next we define the transform chain that will process messages received by this source
      chain:
        # The QueryCounter transform intercepts messages and records metrics on the types of messages that pass through.
        - QueryCounter:
            name: "Main chain"
        # The final transform is a sink, it receives requests from the previous transform and sends them to an actual DB instance.
        # When it receives a response back it routes the response back through every transform in the chain and finally back to the client.
        - ValkeySinkSingle:
            remote_address: "127.0.0.1:6379"
            connect_timeout_ms: 3000

  # A second source definition, this time we lack the QueryCounter transform.
  - Valkey:
      name: "valkey"
      listen_addr: "127.0.0.1:1001"
      chain:
        - ValkeySinkSingle:
            remote_address: "127.0.0.1:6379"
            connect_timeout_ms: 3000
The topology.yaml defines multiple sources.
Each source defines an end to end connection to the database and any transformations that occur along the way.
The chain section is an array of transforms and their respective configuration.
The order in which a transform chain is defined, is the order in which a query will traverse it.
So the first transform in the chain is the source and will get the request from client first, then it will pass it to the second transform in the chain and so on.
As each transform chain is synchronous, with each transform being able to call the next transform in it's chain, the response from the upstream database or generated by a transform down the chain will be passed back up the chain, allowing each transform to handle the response.
The last transform in a chain should be a "terminating" transform. That is, one that passes the query on to the upstream database (e.g. CassandraSinkSingle) or one that returns a Response on it's own ( e.g. DebugReturner).
Under the hood, each transform is able to call it's down-chain transform and wait on it's response. Each Transform has it's own set of configuration values, options and behavior. See Transforms for details.
Metrics
This optional interface will serve Prometheus metrics from /metrics. It will be disabled if the field observability_interface is not provided in configuration.yaml. The following metrics are included by default, others are transform specific.
| Name | Labels | Data type | Description |
|---|---|---|---|
shotover_transform_total_count | transform | counter | Counts the amount of times the transform is used |
shotover_transform_failures_count | transform | counter | Counts the amount of times the transform fails |
shotover_transform_latency_seconds | transform | histogram | The latency for a message batch to go through the transform |
shotover_chain_total_count | chain | counter | Counts the amount of times chain is used |
shotover_chain_failures_count | chain | counter | Counts the amount of times chain fails |
shotover_chain_latency_seconds | chain | histogram | The latency for running chain |
shotover_chain_requests_batch_size | chain | histogram | The number of requests in each request batch passing through chain. |
shotover_chain_responses_batch_size | chain | histogram | The number of responses in each response batch passing through chain. |
shotover_available_connections_count | source | gauge | How many more connections can be opened to source before new connections will be rejected. |
connections_opened | source | counter | Counts the total number of connections that clients have opened against this source. |
shotover_source_to_sink_latency_seconds | sink | histogram | The milliseconds between reading a request from a source TCP connection and writing it to a sink TCP connection |
shotover_sink_to_source_latency_seconds | source | histogram | The milliseconds between reading a response from a sink TCP connection and writing it to a source TCP connection |
Metric data types
Counter
A single value, which can only be incremented, not decremented. Starts out with an initial value of zero.
Histogram
Measures the distribution of values for a set of measurements and starts with no initial values.
Every 20 seconds one of the 3 chunks of historical values are cleared. This means that values are held onto for around 60 seconds.
Gauge
A single value that can increment or decrement over time. Starts out with an initial value of zero.
Log levels and filters
You can configure log levels and filters at /filter. This can be done by a POST HTTP request to the /filter endpoint with the env_filter string set as the POST data. For example:
curl -X PUT -d 'info, shotover_proxy=info, shotover::connection_span::info` http://127.0.0.1:9001/filter
Some examples of how you can tweak this filter:
- configure the first
infoto set the log level for dependencies - configure
shotover=infoto set the log level for shotover itself - set
shotover::connection_span=infotoshotover::connection_span=debugto attach connection info to most log events, this is disabled by default due to a minor performance hit.
For more control over filtering you should understand The tracing filter format.
Hot Reload
Hot reload enables zero-downtime updates by transferring network listeners between Shotover instances. When you start a new Shotover instance with hot reload enabled, it requests the listening TCP sockets from the running instance. Once they are received, the new instance immediately starts accepting connections. Once the new shotover instance is fully operational, it sends a shutdown request to the old shotover instace and the original instance gradually drains its existing connections before shutting down. This allows you to deploy configuration changes or upgrade Shotover versions without dropping client connections.
How It Works
When a new Shotover instance starts with hot reload enabled, it checks if a Unix socket exists at the configured path. Both the original and new Shotover instances must use the exact same socket path for hot reload to work. If the socket exists, the new Shotover starts in hot reload mode and attempts to hot reload from the old Shotover instance.
The hot reload process:
-
The new instance connects to the Unix socket and requests the listening TCP socket file descriptors.
-
The original instance transfers the file descriptors over the Unix socket using SCM_RIGHTS which is a Unix mechanism for sharing file descriptors between processes. After transferring, the original instance stops accepting new connections but continues to serve its existing connections.
-
The new instance recreates the TCP listeners from the file descriptors received from the old shotover instance. These listeners use the same IP addresses and ports as before.
-
The new instance begins accepting new connections. At this point, the old instance still handles the existing connections. Once the new instance is fully functional, it sends a gradual shutdown request over the Unix socket to the old instance, specifying the shutdown duration.
-
The original instance drains its existing connections gradually in chunks (see Gradual Shutdown below).
-
Once all connections are drained, the original instance terminates and removes the Unix socket.
-
Once the old instance terminates, the new instance will be able to create its own Unix socket. Once this is done, the new instance will create its own Unix Socket at the configured path. The socket path is specified as a command line argument.
Gradual Shutdown
If all the connections in the old shotover instance are closed at once, all clients will try to reconnect at the same time. This can overload the new shotover instance. Instead of closing all connections at once, the original instance drains connections in chunks, distributed evenly across the shutdown duration. By default, the shutdown duration is 60 seconds, but it can be configured with --hotreload-gradual-shutdown-seconds.
Connections are closed in chunks at fixed 200ms intervals. The chunk size is calculated to evenly distribute all connections across the total duration. When a connection is closed, the connection handler terminates and clients will detect the closure and tries to reconnect.
For example, with 1000 active connections and a 60-second shutdown duration:
- Total chunks: 60 seconds ÷ 0.2 seconds = 300 chunks
- Connections per chunk: ceiling(1000 ÷ 300) = 4 connections
- Every 200ms, 4 connections will be closed until all are drained
Configuration
To enable hot reload, use the --hotreload-socket flag when starting Shotover:
shotover-proxy --hotreload-socket /tmp/shotover-hotreload.sock
You can also configure the gradual shutdown duration:
shotover-proxy \
  --hotreload-socket /tmp/shotover-hotreload.sock \
  --hotreload-gradual-shutdown-seconds 120
To perform a hot reload, start a second Shotover instance pointing to the same socket path:
shotover-proxy \
  --topology-file topology-v2.yaml \
  --config-file config-v2.yaml \
  --hotreload-socket /tmp/shotover.sock
Considerations
Connection State
Hot reload only transfers listening sockets, not active connections or session state. Existing connections remain with the original instance until drained. When connections are closed during shutdown, clients must reconnect to the new instance.
Shutdown Duration
The configuration of gradual shutdown duration based on your connection volume and client behavior. By default, it will be 60 seconds. If it is not tuned correctly it can lead to various issues. If the duration is too short, it can lead to a situation where too many clients (more than the new instance could handle) try to reconnect to the new instance at once. If the duration is unnecessarily long, it will be a wastage of resources.
Limitations
-
Linux Only: Hot reload uses Unix domain sockets with the SEQPACKET socket type and file descriptor passing via SCM_RIGHTS. It might be possible to adapt this for other Unix systems but requires further investigation. Windows is not supported.
-
Same Host Only: File descriptor transfer only works between processes on the same host. You cannot hot reload across network boundaries.
Writing Custom Transforms
Shotover supports implementing your own custom transforms. Shotover exposes an API via a rust crate from which you can both implement your own transforms and build those transforms into a final shotover binary that can be run in production.
Required Knowledge
This approach is taken to make the most of rust's speed and type safety. However this does come at an up front cost of you needing a basic familiarity with rust. If you have never worked with rust before, you should first spend a day familiarising yourself with it.
Start with the template
To get started writing custom transforms first clone this template:
git clone https://github.com/shotover/shotover-custom-transforms-template
The template comes with:
- two example transforms: the
valkey-get-rewriteandkafka-fetch-rewritecrates- By convention, each transform is its own rust crate
- the final shotover binary: the
shotover-bincrate- this also contains integration tests in
shotover-bin/tests, make sure to utiilize them!
- this also contains integration tests in
Use an example transform that matches the protocol you are working with as a base. e.g.
- valkey-get-rewrite - for valkey
- kafka-fetch-rewrite - for kafka
Running the project
To run the shotover binary containing your project just run:
cargo run --release
This also creates a binary at target/release/shotover-bin which can be used in production.
To run the integration tests run:
cargo test --release
A little cleanup
Feel free to delete transforms that you do not need. That would involve deleting:
- The entire crate folder
- The
membersentry in the workspace levelCargo.toml - The corresponding
shotover::import_transform!line inshotover-bin/src/main.rs
Development
To understand your transform you are using as a base you will want to consult the shotover API documentation From there explore the API to find how to
Sources
Cassandra
Cassandra:
  # The address to listen from.
  listen_addr: "127.0.0.1:6379"

  # The number of concurrent connections the source will accept.
  # If not provided defaults to 512
  connection_limit: 512

  # Defines the behaviour that occurs when Once the configured connection limit is reached:
  # * when true: the connection is dropped.
  # * when false: the connection will wait until a connection can be made within the limit.
  # If not provided defaults to false
  hard_connection_limit: false

  # When this field is provided TLS is used when the client connects to Shotover.
  # Removing this field will disable TLS.
  #tls:
  #  # Path to the certificate file, typically named with a .crt extension.
  #  certificate_path: "tls/localhost.crt"
  #  # Path to the private key file, typically named with a .key extension.
  #  private_key_path: "tls/localhost.key"
  #  # Path to the certificate authority file, typically named with a .crt extension.
  #  # When this field is provided client authentication will be enabled.
  #  #certificate_authority_path: "tls/localhost_CA.crt"

  # Timeout in seconds after which to terminate an idle connection. This field is optional, if not provided, idle connections will never be terminated.
  # timeout: 60

  # The transport that cassandra communication will occur over.
  # TCP is the only Cassandra protocol conforming transport.
  transport: Tcp

  # alternatively:
  #
  # Use the Cassandra protocol over WebSockets using a Shotover compatible driver.
  # transport: WebSocket

  chain:
    Transform1
    Transform2
    ...
Valkey
Valkey:
  # The address to listen from
  listen_addr: "127.0.0.1:6379"

  # The number of concurrent connections the source will accept.
  # If not provided defaults to 512
  connection_limit: 512

  # Defines the behaviour that occurs when Once the configured connection limit is reached:
  # * when true: the connection is dropped.
  # * when false: the connection will wait until a connection can be made within the limit.
  # If not provided defaults to false
  hard_connection_limit: false

  # When this field is provided TLS is used when the client connects to Shotover.
  # Removing this field will disable TLS.
  #tls:
  #  # Path to the certificate file, typically named with a .crt extension.
  #  certificate_path: "tls/valkey.crt"
  #  # Path to the private key file, typically named with a .key extension.
  #  private_key_path: "tls/valkey.key"
  #  # Path to the certificate authority file typically named ca.crt.
  #  # When this field is provided client authentication will be enabled.
  #  #certificate_authority_path: "tls/ca.crt"

  # Timeout in seconds after which to terminate an idle connection. This field is optional, if not provided, idle connections will never be terminated.
  # timeout: 60

  chain:
    Transform1
    Transform2
    ...
Kafka
Kafka:
  # The address to listen from
  listen_addr: "127.0.0.1:6379"

  # The number of concurrent connections the source will accept.
  # If not provided defaults to 512
  connection_limit: 512

  # Defines the behaviour that occurs when Once the configured connection limit is reached:
  # * when true: the connection is dropped.
  # * when false: the connection will wait until a connection can be made within the limit.
  # If not provided defaults to false
  hard_connection_limit: false

  # When this field is provided TLS is used when the client connects to Shotover.
  # Removing this field will disable TLS.
  #tls:
  #  # Path to the certificate file, typically named with a .crt extension.
  #  certificate_path: "tls/localhost.crt"
  #  # Path to the private key file, typically named with a .key extension.
  #  private_key_path: "tls/localhost.key"
  #  # Path to the certificate authority file, typically named with a .crt extension.
  #  # When this field is provided client authentication will be enabled.
  #  #certificate_authority_path: "tls/localhost_CA.crt"

  # Timeout in seconds after which to terminate an idle connection. This field is optional, if not provided, idle connections will never be terminated.
  # timeout: 60

  chain:
    Transform1
    Transform2
    ...
Transforms
Concepts
Sink
Sink transforms send data out of Shotover to some other service. This is the opposite of Shotover's sources, although sources are not transforms.
Terminating
Every transform chain must have exactly one terminating transform and it must be the final transform of the chain. This means that terminating transforms cannot pass messages onto another transform in the same chain. However some terminating transforms define their own sub-chains to allow further processing of messages.
Debug
Debug transforms can be temporarily used to test how your Shotover configuration performs. Don't forget to remove them when you are finished.
Implementation Status
- Alpha - Should not be used in production.
- Beta - Ready for use but is not battle tested.
- Ready - Ready for use.
Future transforms won't be added to the public API while in alpha. But in these early days we have chosen to publish these alpha transforms to demonstrate the direction we want to take the project.
Transforms
| Transform | Terminating | Implementation Status |
|---|---|---|
| CassandraSinkCluster | ✅ | Production Ready |
| CassandraSinkSingle | ✅ | Alpha |
| CassandraPeersRewrite | ❌ | Alpha |
| Coalesce | ❌ | Alpha |
| DebugPrinter | ❌ | Alpha |
| DebugReturner | ✅ | Alpha |
| KafkaSinkCluster | ✅ | Production Ready |
| KafkaSinkSingle | ✅ | Beta |
| NullSink | ✅ | Beta |
| ParallelMap | ✅ | Alpha |
| Protect | ❌ | Alpha |
| QueryCounter | ❌ | Alpha |
| QueryTypeFilter | ❌ | Alpha |
| ValkeyCache | ❌ | Alpha |
| ValkeyClusterPortsRewrite | ❌ | Beta |
| ValkeySinkCluster | ✅ | Beta |
| ValkeySinkSingle | ✅ | Beta |
| Tee | ✅ | Alpha |
| RequestThrottling | ❌ | Alpha |
CassandraSinkCluster
This transform will route Cassandra messages to a node within a Cassandra cluster based on:
- a configured
data_centerandrack - token aware routing
The fact that Shotover is routing to multiple destination nodes will be hidden from the client. Instead Shotover will pretend to be either a single Cassandra node or part of a cluster of Cassandra nodes consisting entirely of Shotover instances.
This is achieved by rewriting system.local and system.peers/system.peers_v2 query results.
The system.local will make Shotover appear to be its own node.
While system.peers/system.peers_v2 will be rewritten to list the configured Shotover peers as the only other nodes in the cluster.
- CassandraSinkCluster:
    # contact points must be within the configured data_center and rack.
    # If this is not followed, Shotover will still function correctly but Shotover will communicate with a
    # node outside of the specified data_center and rack.
    first_contact_points: ["172.16.1.2:9042", "172.16.1.3:9042"]

    # A list of every Shotover node that will be proxying to the same Cassandra cluster.
    # This field should be identical for all Shotover nodes proxying to the same Cassandra cluster.
    shotover_nodes:
        # Address of the Shotover node.
        # This is usually the same address as the Shotover source that is connected to this sink.
        # But it may be different if you want Shotover to report a different address.
      - address: "127.0.0.1:9042"
        # The data_center the Shotover node will report as and route messages to.
        # For performance reasons, the Shotover node should be physically located in this data_center.
        data_center: "dc1"
        # The rack the Shotover node will report as and route messages to.
        # For performance reasons, the Shotover node should be physically located in this rack.
        rack: "rack1"
        # The host_id that Shotover will report as.
        # Does not affect message routing.
        # Make sure to set this to a unique value for each Shotover node, maybe copy one from: https://wasteaguid.info
        host_id: "2dd022d6-2937-4754-89d6-02d2933a8f7a"

      # If you only have a single Shotover instance then you only want a single node.
      # Otherwise if you have multiple Shotover instances then add more nodes e.g.
      #- address: "127.0.0.2:9042"
      #  data_center: "dc1"
      #  rack: "rack2"
      #  host_id: "3c3c4e2d-ba74-4f76-b52e-fb5bcee6a9f4"
      #- address: "127.0.0.3:9042"
      #  data_center: "dc2"
      #  rack: "rack1"
      #  host_id: "fa74d7ec-1223-472b-97de-04a32ccdb70b"

    # Defines which entry in shotover_nodes this Shotover instance will become.
    # This affects:
    # * the shotover_nodes data_center and rack fields are used for routing messages
    #     + Shotover will never route messages outside of the specified data_center
    #     + Shotover will always prefer to route messages to the specified rack
    #         but may route outside of the rack when nodes in the rack are unreachable
    # * which shotover_nodes entry is included in system.local and excluded from system.peers
    local_shotover_host_id: "2dd022d6-2937-4754-89d6-02d2933a8f7a"

    # Number of milliseconds to wait for a connection to be created to a destination cassandra instance.
    # If the timeout is exceeded then connection to another node is attempted
    # If all known nodes have resulted in connection timeouts an error will be returned to the client.
    connect_timeout_ms: 3000

    # When this field is provided TLS is used when connecting to the remote address.
    # Removing this field will disable TLS.
    #tls:
    #  # Path to the certificate authority file, typically named with a .crt extension.
    #  certificate_authority_path: "tls/localhost_CA.crt"
    #  # Path to the certificate file, typically named with a .crt extension.
    #  certificate_path: "tls/localhost.crt"
    #  # Path to the private key file, typically named with a .key extension.
    #  private_key_path: "tls/localhost.key"
    #  # Enable/disable verifying the hostname of the certificate provided by the destination.
    #  #verify_hostname: true

    # Timeout in seconds after which to give up waiting for a response from the destination.
    # This field is optional, if not provided, timeout will never occur.
    # When a timeout occurs the connection to the client is immediately closed.
    # read_timeout: 60
Error handling
If Shotover sends a request to a node and never gets a response, (maybe the node went down), Shotover will return a Cassandra Server error to the client.
This is because the message may or may not have succeeded, so only the client can attempt to retry as the retry may involve checking if the original query did in fact complete successfully.
If no nodes are capable of receiving the query then Shotover will return a Cassandra Overloaded error indicating that the client should retry the query at some point.
All other connection errors will be handled internally by Shotover. And all Cassandra errors will be passed directly back to the client.
Metrics
This transform emits a metrics counter named failed_requests and the labels transform defined as CassandraSinkCluster and chain as the name of the chain that this transform is in.
CassandraSinkSingle
This transform will send/receive Cassandra messages to a single Cassandra node. This will just pass the query directly to the remote node. No cluster discovery or routing occurs with this transform.
- CassandraSinkSingle:
    # The IP address and port of the upstream Cassandra node/service.
    remote_address: "127.0.0.1:9042"

    # Number of milliseconds to wait for a connection to be created to the destination cassandra instance.
    # If the timeout is exceeded then an error is returned to the client.
    connect_timeout_ms: 3000

    # When this field is provided TLS is used when connecting to the remote address.
    # Removing this field will disable TLS.
    #tls:
    #  # Path to the certificate authority file, typically named with a .crt extension.
    #  certificate_authority_path: "tls/localhost_CA.crt"
    #  # Path to the certificate file, typically named with a .crt extension.
    #  certificate_path: "tls/localhost.crt"
    #  # Path to the private key file, typically named with a .key extension.
    #  private_key_path: "tls/localhost.key"
    #  # Enable/disable verifying the hostname of the certificate provided by the destination.
    #  #verify_hostname: true

    # Timeout in seconds after which to give up waiting for a response from the destination.
    # This field is optional, if not provided, timeout will never occur.
    # When a timeout occurs the connection to the client is immediately closed.
    # read_timeout: 60
This transform emits a metrics counter named failed_requests and the labels transform defined as CassandraSinkSingle and chain as the name of the chain that this transform is in.
CassandraPeersRewrite
This transform should be used with the CassandraSinkSingle transform. It will write over the ports of the peers returned by queries to the system.peers_v2 table in Cassandra with a user supplied value (typically the port that Shotover is listening on so Cassandra drivers will connect to Shotover instead of the Cassandra nodes themselves).
- CassandraPeersRewrite:
    # rewrite the peer ports to 9043
    port: 9043
Coalesce
This transform holds onto messages until some requirement is met and then sends them batched together.
Validation will fail if none of the flush_when_ fields are provided, as this would otherwise result in a Coalesce transform that never flushes.
- Coalesce:
    # When this field is provided a flush will occur when the specified number of messages are currently held in the buffer.
    flush_when_buffered_message_count: 2000

    # When this field is provided a flush will occur when the following occurs in sequence:
    # 1. the specified number of milliseconds have passed since the last flush ocurred
    # 2. a new message is received
    flush_when_millis_since_last_flush: 10000
DebugPrinter
This transform will log the query/message at an info level, then call the down-chain transform.
- DebugPrinter
DebugReturner
This transform will drop any messages it receives and return the supplied response.
- DebugReturner
    # return a Valkey response
    Valkey: "42"

    # To intentionally fail, use this variant
    # Fail
KafkaSinkCluster
This transform will route kafka messages to a broker within a Kafka cluster:
- produce messages are routed to the partition leader
- fetch messages are routed to the partition leader
- heartbeat, syncgroup, offsetfetch, joingroup and leavegroup are all routed to the group coordinator
- all other messages go to a random node.
The fact that Shotover is routing to multiple destination nodes will be hidden from the client. Instead Shotover will pretend to be either a single Kafka node or part of a cluster of Kafka nodes consisting entirely of Shotover instances.
This is achieved by rewriting the FindCoordinator, Metadata and DescribeCluster messages to contain the nodes in the shotover cluster instead of the kafka cluster.
Note that: Produce and fetch requests will be split into multiple requests if no single broker can fulfil the request. e.g. A produce request contains records for topics that have leaders on different brokers in the real kafka cluster, but the shotover cluster appeared to have them hosted on the same cluster.
SASL SCRAM
By default KafkaSinkCluster does not support SASL SCRAM authentication, if a client attempts to use SCRAM it will appear as if its not enabled in the server. SCRAM can not be supported normally as it is protected against replaying of auth messages, preventing shotover from opening multiple outgoing connections.
However, SCRAM support can be achieved by enabling the authorize_scram_over_mtls option.
This will, hidden from the client, generate delegation tokens over an mTLS connection that correspond to the username sent over the SCRAM auth requests.
First the clients SCRAM auth requests are routed to a single kafka broker to verify the user has the correct credentials.
Once authentication is confirmed, shotover creates new outgoing connections to different brokers via delegation token authentication. (Outgoing connections are accessible only to the one incoming connection)
If SCRAM authentication against the first kafka broker fails, shotover will terminate the connection before processing any non-auth requests, to ensure the client can not escalate privileges.
- KafkaSinkCluster:
    # Addresses of the initial kafka brokers to connect to.
    first_contact_points: ["172.16.1.2:9092", "172.16.1.3:9092"]

    # A list of every Shotover node that will be proxying to the same kafka cluster.
    # This field should be identical for all Shotover nodes proxying to the same kafka cluster.
    shotover_nodes:
        # Address of the Shotover node that is reported to the kafka clients.
        # This is usually the same address as the Shotover source that is connected to this sink.
        # But it may be different if you want Shotover to report a different address to its clients.
      - address_for_client: "127.0.0.1:9092"
        # Address of the shotover node as used to check for peers that are up.
        # This is usually the same address as the Shotover source that is connected to this sink.
        # But it may be different if you want Shotover to connect to its peers via a different address.
        address_for_peers: "127.0.0.1:9092"
        # The rack the Shotover node will report as and route messages to.
        # For performance reasons, the Shotover node should be physically located in this rack.
        rack: "rack0"
        # The broker ID the Shotover node will report as.
        # Does not affect how shotover will route the requests it receives.
        # Make sure to set this to a unique value for each Shotover node.
        # This must be done to allow the client to properly tell the shotover instances apart.
        broker_id: 0
      # If you only have a single Shotover instance then you only want a single node.
      # Otherwise if you have multiple Shotover instances then add more nodes e.g.
      #- address: "127.0.0.2:9092"
      #  rack: "rack1"
      #  broker_id: 1

    # Defines which entry in shotover_nodes this Shotover instance will become.
    # This determines which rack shotover will route to.
    local_shotover_broker_id: 0

    # Number of milliseconds to wait for a connection to be created to a destination kafka broker.
    # If the timeout is exceeded then connection to another node is attempted
    # If all known nodes have resulted in connection timeouts an error will be returned to the client.
    connect_timeout_ms: 3000

    # Timeout in seconds after which to give up waiting for a response from the destination.
    # This field is optional, if not provided, timeout will never occur.
    # When a timeout occurs the connection to the client is immediately closed.
    # read_timeout: 60

    # Shotover will regularly open a TCP connection to each of its peers to check if they are up or down.
    # If shotover detects that a peer is down shotover will exclude the down peer from its metadata reports to the client.
    # Each peer is checked in a round robin fashion and this `check_shotover_peers_delay_ms` field defines the milliseconds delay taken before moving onto the next peer to check.
    # If the connection cannot be established within connect_timeout_ms, then the peer is considered down.
    # If this field is not provided, checking of shotover nodes state will be disabled and no outgoing TCP connections to peers will be made.
    check_shotover_peers_delay_ms: 3000

    # When this field is provided TLS is used when connecting to the remote address.
    # Removing this field will disable TLS.
    #tls:
    #  # Path to the certificate authority file, typically named with a .crt extension.
    #  certificate_authority_path: "tls/localhost_CA.crt"
    #  # Path to the certificate file, typically named with a .crt extension.
    #  certificate_path: "tls/localhost.crt"
    #  # Path to the private key file, typically named with a .key extension.
    #  private_key_path: "tls/localhost.key"
    #  # Enable/disable verifying the hostname of the certificate provided by the destination.
    #  #verify_hostname: true

    # When this field is provided authorization of SCRAM over mTLS is enabled.
    # Removing this field will disable the feature.
    #authorize_scram_over_mtls:
    #  # This must point at a kafka port that exposes mTLS authentication for a user capable of creating delegation tokens.
    #  mtls_port_contact_points: ["172.16.1.2:9094"]
    #  # The TLS certs for an mTLS user capable of creating delegation tokens
    #  tls:
    #    certificate_authority_path: "tls/mtls_localhost_CA.crt"
    #    certificate_path: "tls/mtls_localhost.crt"
    #    private_key_path: "tls/mtls_localhost.key"
    #    verify_hostname: true
    #  # The lifetime that delegation tokens will be created with.
    #  # Delegation tokens will automatically be recreated after they have passed half of their lifetime.
    #  delegation_token_lifetime_seconds: 86400 # 1 day
KafkaSinkSingle
This transform will send/receive Kafka messages to a single Kafka node running on the same machine as shotover. All kafka brokers in the cluster must be configured with a shotover instance in front of them. All shotover instances must be on the same port X and all kafka instances must use another port Y. The client will then connect via shotover's port X.
In order to force clients to connect through shotover the FindCoordinator, Metadata and DescribeCluster messages are rewritten to use the shotover port.
- KafkaSinkSingle:
    # The port of the upstream Kafka node/service.
    destination_port: 9092

    # Number of milliseconds to wait for a connection to be created to the destination kafka instance.
    # If the timeout is exceeded then an error is returned to the client.
    connect_timeout_ms: 3000

    # Timeout in seconds after which to give up waiting for a response from the destination.
    # This field is optional, if not provided, timeout will never occur.
    # When a timeout occurs the connection to the client is immediately closed.
    # read_timeout: 60

    # When this field is provided TLS is used when connecting to the remote address.
    # Removing this field will disable TLS.
    #tls:
    #  # Path to the certificate authority file, typically named with a .crt extension.
    #  certificate_authority_path: "tls/localhost_CA.crt"
    #  # Path to the certificate file, typically named with a .crt extension.
    #  certificate_path: "tls/localhost.crt"
    #  # Path to the private key file, typically named with a .key extension.
    #  private_key_path: "tls/localhost.key"
    #  # Enable/disable verifying the hostname of the certificate provided by the destination.
    #  #verify_hostname: true
This transform emits a metrics counter named failed_requests and the labels transform defined as CassandraSinkSingle and chain as the name of the chain that this transform is in.
NullSink
This transform will drop any messages it receives and return an empty response.
- NullSink
ParallelMap
This transform will send messages in a single batch in parallel across multiple instances of the chain.
If we have a parallelism of 3 then we would have 3 instances of the chain: C1, C2, C3. If the batch then contains messages M1, M2, M3, M4. Then the messages would be sent as follows:
- M1 would be sent to C1
- M2 would be sent to C2
- M3 would be sent to C3
- M4 would be sent to C1
- ParallelMap:
    # Number of duplicate chains to send messages through.
    parallelism: 1
    # if true then responses will be returned in the same as order as the queries went out.
    # if it is false then response may return in any order.
    ordered_results: true
    # The chain that messages are sent through
    chain:
      - QueryCounter:
          name: "DR chain"
      - ValkeySinkSingle:
          remote_address: "127.0.0.1:6379"
          connect_timeout_ms: 3000
Protect
This transform will encrypt specific fields before passing them down-chain, it will also decrypt those same fields from a response. The transform will create a data encryption key on an user defined basis (e.g. per primary key, per value, per table etc).
The data encryption key is encrypted by a key encryption key and persisted alongside the encrypted value (alongside other needed cryptographic material). This transform provides the basis for in-application cryptography with unified key management between datastores. The encrypted value is serialised using bincode and should then be written to a blob field by a down-chain transform.
Fields are protected using ChaCha20-Poly1305. Modification of the field is also detected and raised as an error. DEK protection is dependent on the key manager being used.
Local
- Protect:
    # A key_manager config that configures the protect transform with how to look up keys.
    key_manager:
      Local:
        kek: Ht8M1nDO/7fay+cft71M2Xy7j30EnLAsA84hSUMCm1k=
        kek_id: ""

    # A mapping of keyspaces, tables and columns to encrypt.
    keyspace_table_columns:
      test_protect_keyspace:
        test_table:
          - col1
AWS
- Protect:
    # A key_manager config that configures the protect transform with how to look up keys.
    key_manager:
      AWSKms:
        endpoint: "http://localhost:5000"
        region: "us-east-1"
        cmk_id: "alias/aws/secretsmanager"
        number_of_bytes: 32

    # A mapping of keyspaces, tables and columns to encrypt.
    keyspace_table_columns:
      test_protect_keyspace:
        test_table:
          - col1
Note: Currently the data encryption key ID function is just defined as a static string, this will be replaced by a user defined script shortly.
QueryCounter
This transform will log the queries that pass through it. The log can be accessed via the Shotover metrics
- QueryCounter:
    # this name will be logged with the query count
    name: "DR chain"
This transform emits a metrics counter named query_count with the label name defined as the name from the config, in the example it will be DR chain.
QueryTypeFilter
This transform will drop messages that match the specified filter. You can either filter out all messages that do not match those on the AllowList or filter the messages that match those on the DenyList.
# Possible message types to filter: [Read, Write, ReadWrite, SchemaChange, PubSubMessage]

- QueryTypeFilter:
    # only allow read messages through with an allow list
    AllowList: [Read]

    # only allow read messages by blocking all other messages with a deny list
    # DenyList: [Write, ReadWrite, SchemaChange, PubSubMessage]
ValkeyCache
This transform will attempt to cache values for a given primary key in a Valkey hash set. It is a primarily implemented as a read behind cache. It currently expects an SQL based AST to figure out what to cache (e.g. CQL, PGSQL) and updates to the cache and the backing datastore are performed sequentially.
- ValkeyCache:
    caching_schema:
      test:
        partition_key: [test]
        range_key: [test]
    chain:
      # The chain can contain anything but must end in a Valkey sink
      - ValkeySinkSingle:
          # The IP address and port of the upstream valkey node/service.
          remote_address: "127.0.0.1:6379"
          connect_timeout_ms: 3000
ValkeyClusterPortsRewrite
This transform should be used with the ValkeySinkCluster transform. It will write over the ports of the nodes returned by CLUSTER SLOTS or CLUSTER NODES with a user supplied value (typically the port that Shotover is listening on so cluster aware Valkey drivers will direct traffic through Shotover instead of the nodes themselves).
- ValkeyClusterPortsRewrite:
    # rewrite the ports returned by `CLUSTER SLOTS` and `CLUSTER NODES` to use this port.
    new_port: 6380
ValkeySinkCluster
This transform is a full featured Valkey driver that will connect to a Valkey cluster and handle all discovery, sharding and routing operations.
- ValkeySinkCluster:
    # A list of IP address and ports of the upstream valkey nodes/services.
    first_contact_points: ["127.0.0.1:2220", "127.0.0.1:2221", "127.0.0.1:2222", "127.0.0.1:2223", "127.0.0.1:2224", "127.0.0.1:2225"]

    # By default ValkeySinkCluster will attempt to emulate a single non-clustered valkey node by completely hiding the fact that valkey is a cluster.
    # However, when this field is provided, this cluster hiding is disabled.
    # Instead other nodes in the cluster will only be accessed when performing a command that accesses a slot.
    # All other commands will be passed directly to the direct_connection node.
    # direct_connection: "127.0.0.1:2220"

    # The number of connections in the connection pool for each node.
    # e.g. if connection_count is 4 and there are 4 nodes there will be a total of 16 connections.
    # When this field is not provided connection_count defaults to 1.
    connection_count: 1

    # Number of milliseconds to wait for a connection to be created to a destination valkey instance.
    # If the timeout is exceeded then connection to another node is attempted
    # If all known nodes have resulted in connection timeouts an error will be returned to the client.
    connect_timeout_ms: 3000

    # When this field is provided TLS is used when connecting to the remote address.
    # Removing this field will disable TLS.
    #tls:
    #  # Path to the certificate authority file, typically named ca.crt.
    #  certificate_authority_path: "tls/ca.crt"
    #  # Path to the certificate file, typically named with a .crt extension.
    #  certificate_path: "tls/valkey.crt"
    #  # Path to the private key file, typically named with a .key extension.
    #  private_key_path: "tls/valkey.key"
    #  # Enable/disable verifying the hostname of the certificate provided by the destination.
    #  #verify_hostname: true
Unlike other Valkey cluster drivers, this transform does support pipelining. It does however turn each command from the pipeline into a group of requests split between the master Valkey node that owns them, buffering results as within different Valkey nodes as needed. This is done sequentially and there is room to make this transform split requests between master nodes in a more concurrent manner.
Latency and throughput will be different from pipelining with a single Valkey node, but not by much.
This transform emits a metrics counter named failed_requests and the labels transform defined as ValkeySinkCluster and chain as the name of the chain that this transform is in.
Differences to real Valkey
On an existing authenticated connection, a failed auth attempt will not "unauthenticate" the user. This behaviour matches Valkey 6 but is different to Valkey 5.
Completeness
Note: Currently ValkeySinkcluster does not support the following functionality:
- Valkey Transactions
- Scan based operations e.g. SSCAN
ValkeySinkSingle
This transform will take a query, serialise it into a RESP2 compatible format and send to the Valkey compatible database at the defined address.
- ValkeySinkSingle:
    # The IP address and port of the upstream valkey node/service.
    remote_address: "127.0.0.1:6379"

    # Number of milliseconds to wait for a connection to be created to the destination valkey instance.
    # If the timeout is exceeded then an error is returned to the client.
    connect_timeout_ms: 3000

    # When this field is provided TLS is used when connecting to the remote address.
    # Removing this field will disable TLS.
    #tls:
    #  # Path to the certificate authority file, typically named ca.crt.
    #  certificate_authority_path: "tls/ca.crt"
    #  # Path to the certificate file, typically named with a .crt extension.
    #  certificate_path: "tls/valkey.crt"
    #  # Path to the private key file, typically named with a .key extension.
    #  private_key_path: "tls/valkey.key"
    #  # Enable/disable verifying the hostname of the certificate provided by the destination.
    #  #verify_hostname: true
Note: this will just pass the query to the remote node. No cluster discovery or routing occurs with this transform.
This transform emits a metrics counter named failed_requests and the labels transform defined as ValkeySinkSingle and chain as the name of the chain that this transform is in.
Tee
This transform sends messages to both the defined sub chain and the remaining down-chain transforms.
The response from the down-chain transform is returned back up-chain but various behaviours can be defined by the behaviour field to handle the case when the responses from the sub chain and down-chain do not match.
Tee also exposes an optional HTTP API to switch which chain to use as the "result source", that is the chain to return responses from.
GET /transform/tee/result-source will return regular-chain or tee-chain indicating which chain is being used for the result source.
PUT /transform/tee/result-source with the body content as either regular-chain or tee-chain to set the result source.
- Tee:
    # Ignore responses returned by the sub chain
    behavior: Ignore

    # Alternatively:
    #
    # If the responses returned by the sub chain do not equal the responses returned by down-chain then return an error.
    # behavior: FailOnMismatch
    #
    # If the responses returned by the sub chain do not equal the responses returned by down-chain then log the mismatch at the warning level.
    # behavior: LogWarningOnMismatch
    #
    # If the responses returned by the sub chain do not equal the responses returned by down-chain,
    # then the original message is also sent down the SubchainOnMismatch sub chain.
    # This is useful for logging failed messages.
    # behavior:
    #   SubchainOnMismatch:
    #     - QueryTypeFilter:
    #         DenyList: [Read]
    #     - NullSink

    # The port that the HTTP API will listen on.
    # When this field is not provided the HTTP API will not be run.
    # http_api_port: 1234
    #
    # Timeout for sending to the sub chain in microseconds
    timeout_micros: 1000
    # The number of message batches that the tee can hold onto in its buffer of messages to send.
    # If they arent sent quickly enough and the buffer is full then tee will drop new incoming messages.
    buffer_size: 10000
    # The sub chain to send duplicate messages through
    chain:
      - QueryTypeFilter:
          DenyList: [Read]
      - NullSink
This transform emits a metrics counter named tee_dropped_messages and the label chain as Tee.
RequestThrottling
This transform will backpressure requests to Shotover, ensuring that throughput does not exceed the max_requests_per_second value.max_requests_per_second has a minimum allowed value of 50 to ensure that drivers such as Cassandra are able to complete their startup procedure correctly. In Shotover, a "request" is counted as a query/statement to upstream service. In Cassandra, the list of queries in a BATCH statement are each counted as individual queries. It uses a Generic Cell Rate Algorithm.
- RequestThrottling
    max_requests_per_second: 20000
Valkey Clustering
The following guide shows you how to configure Shotover Proxy to support transparently proxying Valkey cluster unaware clients to a Valkey cluster.
General Configuration
First you need to setup a Valkey cluster and Shotover.
The easiest way to do this is with this example docker-compose.yaml
You should first inspect the docker-compose.yaml to understand what the cluster looks like and how its exposed to the network.
Then run:
curl -L https://raw.githubusercontent.com/shotover/shotover-examples/main/valkey-cluster-1-many/docker-compose.yaml --output docker-compose.yaml
Alternatively you could spin up a hosted Valkey cluster on any cloud provider that provides it. This more accurately reflects a real production use but will take a bit more setup. And reduce the docker-compose.yaml to just the shotover part
services:
  shotover-0:
    networks:
      cluster_subnet:
        ipv4_address: 172.16.1.9
    image: shotover/shotover-proxy:v0.1.10
    volumes:
      - .:/config
networks:
  cluster_subnet:
    name: cluster_subnet
    driver: bridge
    ipam:
      driver: default
      config:
        - subnet: 172.16.1.0/24
          gateway: 172.16.1.1
Shotover Configuration
---
sources:
  - Valkey:
      name: "valkey"
      # define where shotover listens for incoming connections from our client application (`valkey-benchmark`).
      listen_addr: "0.0.0.0:6379"
      chain:
        # configure Shotover to connect to the Valkey cluster via our defined contact points
        - ValkeySinkCluster:
            first_contact_points:
              - "172.16.1.2:6379"
              - "172.16.1.3:6379"
              - "172.16.1.4:6379"
              - "172.16.1.5:6379"
              - "172.16.1.6:6379"
              - "172.16.1.7:6379"
            connect_timeout_ms: 3000
Modify an existing topology.yaml or create a new one and place the above example as the file's contents.
If you didnt use the standard docker-compose.yaml setup then you will need to change first_contact_points to point to the Valkey instances you used.
You will also need a config.yaml to run Shotover.
curl -L https://raw.githubusercontent.com/shotover/shotover-examples/main/valkey-cluster-1-1/config.yaml --output config.yaml
Starting
We can now start the services with:
docker-compose up -d
Testing
With your Valkey Cluster and Shotover now up and running, we can test out our client application. Let's start it up!
valkey-benchmark -h 172.16.1.9 -t set,get
Valkey Clustering with cluster aware client
The following guide shows you how to configure Shotover to support proxying Valkey cluster aware clients to Valkey cluster.
Overview
In this example, we will be connecting to a Valkey cluster that has the following topology:
172.16.1.2:6379172.16.1.3:6379172.16.1.4:6379172.16.1.5:6379172.16.1.6:6379172.16.1.7:6379
Shotover will be deployed as a sidecar to each node in the Valkey cluster, listening on 6380. Use the following docker-compose.yaml to run the Valkey cluster and Shotover sidecars.
curl -L https://raw.githubusercontent.com/shotover/shotover-examples/main/valkey-cluster-1-1/docker-compose.yaml --output docker-compose.yaml
Below we can see an example of a Valkey node and it's Shotover sidecar. Notice they are running on the same network address (172.16.1.2) and the present directory is being mounted to allow Shotover to access the config and topology files.
valkey-node-0:
  image: bitnamilegacy/valkey-cluster:7.2.5-debian-12-r4
  networks:
    cluster_subnet:
      ipv4_address: 172.16.1.2
  environment:
    - 'ALLOW_EMPTY_PASSWORD=yes'
    - 'VALKEY_NODES=valkey-node-0 valkey-node-1 valkey-node-2'

shotover-0:
  restart: always
  depends_on:
    - valkey-node-0
  image: shotover/shotover-proxy
  network_mode: "service:valkey-node-0"
  volumes:
    - type: bind
      source: $PWD
      target: /config
In this example we will use valkey-benchmark with cluster mode enabled as our Valkey cluster aware client application.
Configuration
First we will modify our topology.yaml file to have a single Valkey source. This will:
- Define how Shotover listens for incoming connections from our client application (
valkey-benchmark). - Configure Shotover to connect to the Valkey node via our defined remote address.
- Configure Shotover to rewrite all Valkey ports with our Shotover port when the cluster aware driver is talking to the cluster, through Shotover.
- Connect our Valkey Source to our Valkey cluster sink (transform).
---
sources:
  - Valkey:
      name: "valkey"
      listen_addr: "0.0.0.0:6380"
      chain:
        - ValkeyClusterPortsRewrite:
            new_port: 6380
        - ValkeySinkSingle:
            remote_address: "0.0.0.0:6379"
            connect_timeout_ms: 3000
Modify an existing topology.yaml or create a new one and place the above example as the file's contents.
You will also need a config.yaml to run Shotover.
curl -L https://raw.githubusercontent.com/shotover/shotover-examples/main/valkey-cluster-1-1/config.yaml --output config.yaml
Starting
We can now start the services with:
docker-compose up -d
Testing
With everything now up and running, we can test out our client application. Let's start it up!
First we will run valkey-benchmark directly on our cluster.
valkey-benchmark -h 172.16.1.2 -p 6379 -t set,get --cluster
If everything works correctly you should see the following, along with the benchmark results which have been omitted for brevity. Notice all traffic is going through the Valkey port on 6379.
Cluster has 3 master nodes:

Master 0: d5eaf45804215f80cfb661928c1a84e1da7406a9 172.16.1.3:6379
Master 1: d774cd063e430d34a71bceaab851d7744134e22f 172.16.1.2:6379
Master 2: 04b301f1b165d81d5fb86e50312e9cc4898cbcce 172.16.1.4:6379
Now run it again but on the Shotover port this time.
valkey-benchmark -h 172.16.1.2 -p 6380 -t set,get --cluster
You should see the following, notice that all traffic is going through Shotover on 6380 instead of the Valkey port of 6379:
Cluster has 3 master nodes:

Master 0: 04b301f1b165d81d5fb86e50312e9cc4898cbcce 172.16.1.4:6380
Master 1: d5eaf45804215f80cfb661928c1a84e1da7406a9 172.16.1.3:6380
Master 2: d774cd063e430d34a71bceaab851d7744134e22f 172.16.1.2:6380
Cassandra Cluster
The following guide shows you how to configure Shotover with support for proxying to a Cassandra Cluster.
Overview
In this example, we will be connecting to a Cassandra cluster that has the following topology:
172.16.1.2:9042172.16.1.3:9042172.16.1.4:9042
Rewriting the peer ports
Shotover will be deployed as a sidecar to each node in the Cassandra cluster, listening on 9043. Use the following docker-compose.yaml to run the Cassandra cluster and Shotover sidecars. In this example we want to ensure that all our traffic to Cassandra goes through Shotover.
curl -L https://raw.githubusercontent.com/shotover/shotover-examples/main/cassandra-1-1/docker-compose.yaml --output docker-compose.yaml
Below we can see an example of a Cassandra node and it's Shotover sidecar, notice that they are running on the same network address (172.16.1.2) and the present directory is being mounted to allow Shotover to access the config and topology files.
  cassandra-two:
    image: bitnami/cassandra:4.0
    networks:
      cassandra_subnet:
        ipv4_address: 172.16.1.3
    healthcheck: *healthcheck
    environment: *environment

  shotover-one:
    restart: always
    depends_on:
      - cassandra-two
    image: shotover/shotover-proxy
    network_mode: "service:cassandra-two"
    volumes:
      - type: bind
        source: $PWD
        target: /config
In this example we will use cqlsh to connect to our cluster.
Configuration
First we will create our topology.yaml file to have a single Cassandra source. This will:
- Define how Shotover listens for incoming connections from our client (
cqlsh). - Configure Shotover to connect to the Cassandra node via our defined remote address.
- Configure Shotover to rewrite all Cassandra ports with our Shotover port when the client connects
- Connect our Cassandra source to our Cassandra sink (transform).
---
sources:
  - Cassandra:
      listen_addr: "0.0.0.0:9043"
      chain:
        - CassandraPeersRewrite:
            port: 9043
        - CassandraSinkSingle:
            remote_address: "127.0.0.1:9042"
            connect_timeout_ms: 3000
Modify an existing topology.yaml or create a new one and place the above example as the file's contents.
You will also need a config.yaml to run Shotover.
curl -L https://raw.githubusercontent.com/shotover/shotover-examples/main/cassandra-1-1/config.yaml --output config.yaml
Starting
We can now start the services with:
docker-compose up -d
Testing
With everything now up and running, we can test it out with our client. Let's start it up!
First we will run cqlsh directly on our cluster with the command:
cqlsh 172.16.1.2 9042 -u cassandra -p cassandra
and check the system.peers_v2 table with the following query:
SELECT peer, native_port FROM system.peers_v2;
You should see the following results returned:
 peer       | native_port
------------+-------------
 172.16.1.3 |        9042
 172.16.1.4 |        9042
Now run it again but on the Shotover port this time, run:
cqlsh 172.16.1.2 9043 -u cassandra -p cassandra
and use the same query again. You should see the following results returned, notice how the native_port column is now the Shotover port of 9043:
 peer       | native_port
------------+-------------
 172.16.1.3 |        9043
 172.16.1.4 |        9043
If everything has worked, you will be able to use Cassandra, with your connection going through Shotover!
Adding Rate Limiting
The next section of this tutorial will cover adding rate limiting to your Cassandra cluster with Shotover. We will add the RequestThrottling transform to our topology.yaml as shown below. This transform should go at the front of the chain to prevent any unnecessary operations from occurring if a query is going to be rate limited.
---
sources:
  - Cassandra:
      listen_addr: "0.0.0.0:9043"
      chain:
        - RequestThrottling:
            max_requests_per_second: 40000
        - CassandraPeersRewrite:
            port: 9043
        - CassandraSinkSingle:
            remote_address: "127.0.0.1:9042"
            connect_timeout_ms: 3000
In this example we will set your max_requests_per_second to 40,000. This will allow a max of 40,000 queries per second to go through this Shotover instance, across all connections.
After completing this step you can restart your cluster with docker-compose restart to enable rate limiting.
Contributing to Shotover
This guide describes how to setup and use your environment for contributing to shotover itself.
Setup
Shotover requires rustup to be installed so that the project specific rust version will be used.
The rest of the setup is specific to your operating system. Shotover supports development on linux and partially supports macOS.
Setting up on Linux
On linux, all tests will pass as long as the required dependencies are installed.
See the Linux specific setup instructions
Setting up on macOS
- All tests that use a single docker instance will pass. But some tests with more than one docker instance will fail.
- Tests that rely on external C++ dependencies cannot be built.
- They are hidden behind the
cassandra-cpp-driver-testsandkafka-cpp-driver-testsfeature flags to allow the rest of the tests to build on macOS
- They are hidden behind the
Everything else should be buildable and pass.
See the macOS specific setup instructions
Setting up via ec2-cargo
The shotover repo contains a tool ec2-cargo which makes it easy to setup and a linux EC2 instance for developing shotover.
This can be used by:
- Linux users to test on a fresh machine or to test on a different cpu architecture
- macOS users to run tests that do not run on macOS
- To enable development from any other OS
Refer to the ec2-cargo docs.
Run Shotover tests
Shotover's test suite must be run via nextest as we rely on its configuration to avoid running incompatible integration tests concurrently.
To use nextest:
- Install nextest:
cargo install cargo-nextest --locked - Then run the tests:
cargo nextest run
The tests rely on configuration in tests/test-configs/, so if for example, you wanted to manually setup the services for the valkey-passthrough test, you could run these commands in the shotover-proxy directory:
docker-compose -f shotover-proxy/tests/test-configs/valkey-passthrough/docker-compose.yaml upcargo run -- --topology-file tests/test-configs/valkey-passthrough/topology.yaml
Submitting a PR
Before submitting a PR you can run the following in preparation to make your PR more likely to pass CI:
cargo fmt --all- Ensure your code follows standard rust formatting.cargo clippy --all-features --all-targets- Ensure you haven't introduced any warnings.cargo nextest run --all-features --all-targets- Ensure all tests pass.
For formatting you should configure your IDE to auto-format on save so that you never hit this issue at CI time.
For clippy you can setup your IDE or a tool like bacon to run clippy while you work.
If you find clippy too noisy, you should setup cargo check to run during development instead.
But you will have to eventually resolve the clippy warnings before the PR can be merged.
For the integration tests, CI will complete quicker than your local machine. So its much more realistic to just:
- Run some tests related to your changes
- Submit your PR as a draft
- See what fails
- Fix the failures before marking as ready to review.
Also note that CI will run clippy against every permutation of features.
So check what its doing in .github/workflows/lint.yaml if you have a failure in CI that is not reproducing locally.
Building Shotover (release)
To build a release binary of shotover run cargo build --release -p shotover-proxy:
- The built binary is located at
target/release/shotover-proxy - The
--releaseis very important, never deploy a non-release binary as it will be far too slow. - The
-p shotover-proxyis optional but skips building artifacts only used during development. Doing this is much faster to build and avoids extra external dependencies.
Investigating shotover bugs
This document describes the general process I follow for debugging. There is no need to strictly adhere to it, but maybe you will find something useful here.
Ensure the project has no warnings
The rust compiler's warnings should always be addressed immediately as they can point out program breaking mistakes.
For example a missed .await will leave a future unresolved but is hard to notice from visual inspection.
I recommend ensuring cargo check --all-targets returns no errors at all times.
You can set features to reduce runtime e.g. cargo check --all-targets --no-default-features --features kafka but that will disable some dead code warnings (fine for development).
You can use a tool like bacon or cargo watch to keep track of warnings.
Note that CI will fail if your PR has any warnings anyway, so you'll have to address them all eventually.
Failing test
Write or modify an integration test to reproduce the bug.
Integration tests live at shotover-proxy/tests/.
Add DebugPrinter
Add DebugPrinter to the test's topology.yaml.
This will setup shotover to log every request and response that passes through.
For example:
sources:
  - Kafka:
      name: "kafka"
      listen_addr: "127.0.0.1:9192"
      chain:
        - DebugPrinter # Add this line here!
        - KafkaSinkSingle:
            destination_port: 9092
            connect_timeout_ms: 3000
For a simple valkey request/response, the logs will look like:
shotover   06:37:14.712042Z  INFO connection{id=2 source="valkey"}: shotover::transforms::debug::printer: Request: Valkey Array([BulkString(b"GET"), BulkString(b"bar")])
shotover   06:37:14.712212Z  INFO connection{id=2 source="valkey"}: shotover::transforms::debug::printer: Response: Valkey BulkString(b"foo")
Run the test
Run the test by:
cargo nextest run --no-default-features --features kafka kafka_int_tests::passthrough_standard::case_1_java --nocapture
Broken down we have:
--no-default-features --features kafkawill compile only the parts of shotover and the integration tests required for the specified protocol.- This will drastically improve time to compile shotover and the tests, currently it drops from 15s to 5s. The difference will grow as shotover grows.
- For a full list of features refer to the
[features]section in shotover-proxy/Cargo.toml
kafka_int_tests::passthrough_standard::case_1_javathe exact name of the test to run.- We could also specify just
kafka_int_tests::passthroughto run every test inkafka_int_teststhat starts withpassthrough. Refer to the nextest docs for more advanced filtering.
- We could also specify just
--nocapturedisables the test runner from capturing (and hiding) the test and shotover's stdout+stderr.- By default the test runner captures the output so it can avoid displaying output from a test that passed and is therefore uninteresting.
- Disabling capturing when debugging is useful since:
- Even if the test passed we can still access the logs
- We can see the test output in real time.
- stdout and stderr remain intermingled instead of separated.
Log levels
By default shotover and the integration tests will run at log level INFO. This means INFO, WARN and ERROR level logs will be emitted, while DEBUG and TRACE level logs will be dropped.
You can alter the log level used by a test run by running RUST_LOG=DEBUG cargo nextest run ...
Exploration
Examine the logs emitted by DebugPrinter.
From the perspective of a DebugPrinter in a simple chain that looks like Source -> DebugPrinter -> Sink:
- Requests are coming from the source codec.
- Responses are coming from the sink and into the sink from the sink's codec.
So determine whether to first investigate the source codec or sink by determining if the problem is occurring in the debug printer's requests or responses.
Sprinkle tracing::info!("some log {}", some.variable) around suspect areas in the codebase to narrow down whats going wrong.
Rerun the test each time to learn more about the behavior of the system and narrow down your search.
Delete these extra logs when you are finished your investigation. Some of them could be downgraded to a tracing::debug!() and kept if they are found to be generally valuable.
End to end overview
This document will use Valkey as an example for explaining the end to end flow of messages through shotover. We will walk through a single request from the client and Valkey's response. The same flow within Shotover is used for all protocols, so this document should still be useful if you are working with another protocol.
The general flow of messages though Shotover looks like:
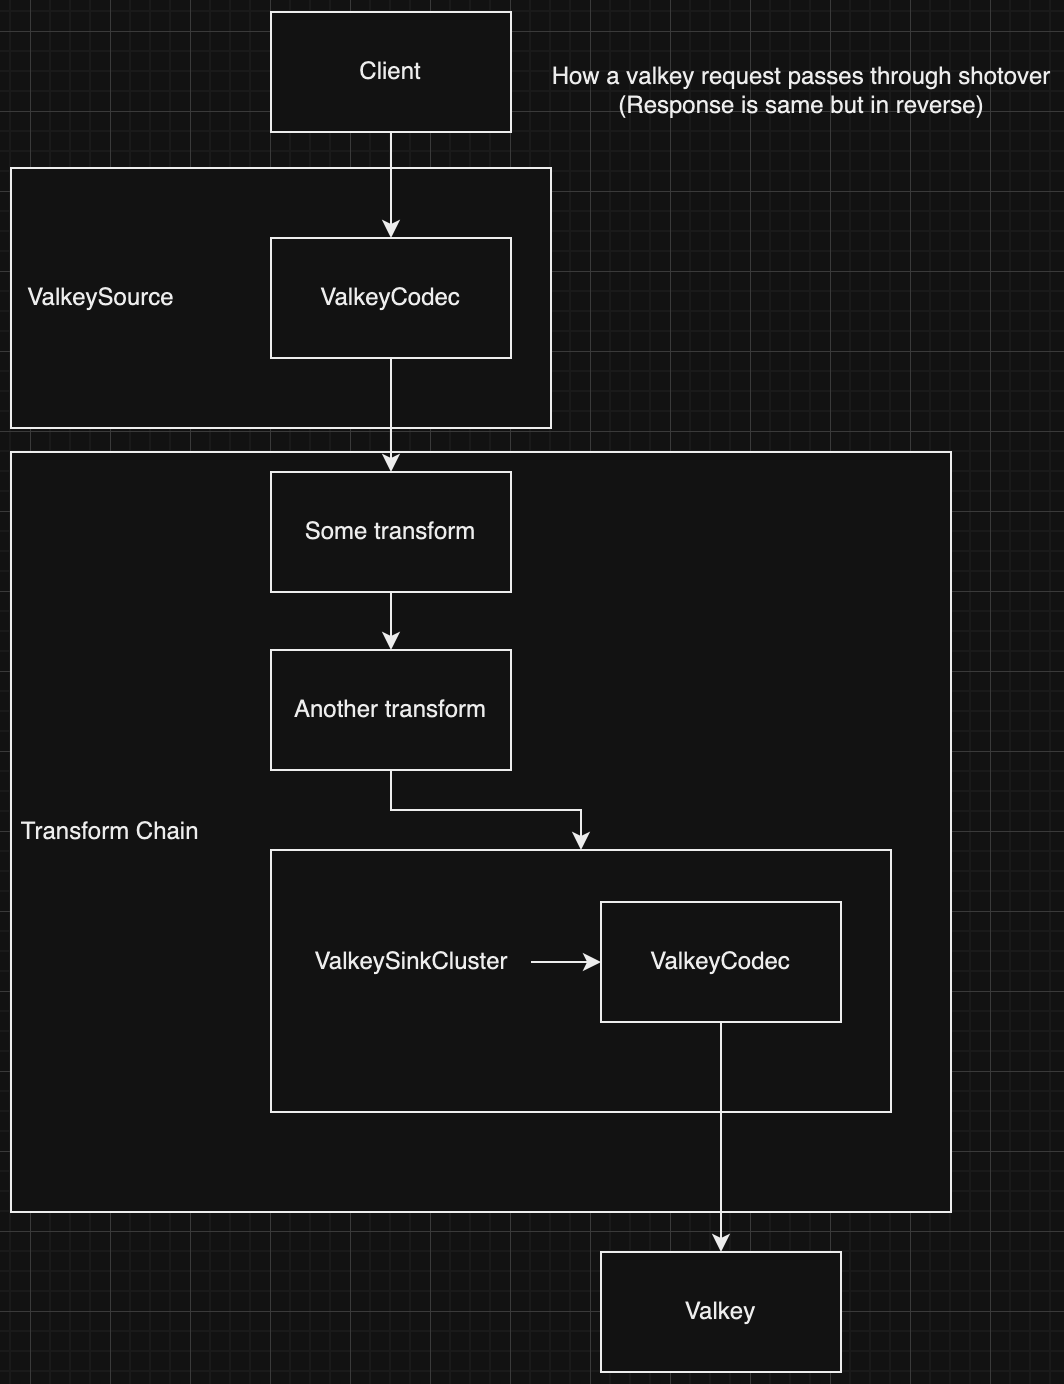
Shotover Config
In the scenario this document works through, Shotover will be run with the following topology.yaml configuration:
sources:
  - Valkey:
      name: "valkey"
      listen_addr: "127.0.0.1:6379"
      chain:
        # A made up transform for our example.
        - SomeTransform
        # Another made up transform for our example
        - AnotherTransform
        # The sink transform that routes Valkey requests to the correct node in the cluster
        - ValkeySinkCluster:
            first_contact_points:
              - "172.16.1.2:6379"
              - "172.16.1.3:6379"
              - "172.16.1.4:6379"
            connect_timeout_ms: 3000
The client sends request
A user sends a Valkey command through their valkey client:
- The user runs a set command by calling:
client.set("foo", "bar"). - The client translates the
set(..)arguments into a RESP request that looks like:["SET", "foo", "bar"] - A hash is taken of the key
foowhich is used to choose which Shotover node to send the request to. - The RESP request is converted into the RESP wire format, which is purely ascii except for user data:
*3
$3
SET
$3
foo
$3
bar
*3 means an array with 3 elements.
The first element is $3\nSET, which means a string of length 3 containing SET.
The second and third arguments are also strings of length 3: $3\nfoo and $3\nbar
- The bytes of the message are sent over a TCP connection to the chosen Shotover node. In this example, no such connection exists so a new one is made.
Shotover accepts a new connection
When ValkeySource is created during shotover startup, it creates a TcpCodecListener and then calls TcpCodecListener::run which listens in a background task for incoming TCP connections on the sources configured port.
TcpCodecListener accepts a new connection from the Valkey client and constructs and runs a Handler type, which manages the connection.
The Handler type creates:
- read/write tasks around the TCP connection.
- A
ValkeyEncoderandValkeyDecoderpair is created from ValkeyCodecBuilder. - The
ValkeyEncoderis given to the write task - The
ValkeyDecoderis given to the read task
- A
- a new transform chain instance to handle the requests coming in from this connection.
- This transform chain instance handles a single connection passing from the client to Valkey and isolates it from other connections.
The handler type then continues to run, routing requests and responses between the transform chain and the client connection read/write tasks.
Finally, at this point our callstack will look something like this. Each section of this document will include such a diagram, showing a high level representation of the call stack during the section.
block-beta
    block:main["Call Stack\n\n\n\n\n"]
        columns 1
        space

        ValkeySource
        IncomingConnectionTask
    end
Source ValkeyDecoder
The tokio_util crate provides an Encoder trait and a Decoder trait.
Through this interface:
- we provide the logic for how to encode and decode messages into and out of a buffer of bytes by implementing the traits.
- tokio provides the logic for reading and writing the bytes from the actual TCP connection via the FramedWrite and FramedRead types.
Since TCP itself provides a stream of bytes without any application level framing 1 it is up to the database protocol itself to implement framing on top of TCP.
So the logic of a Decoder implementation must gracefully handle incomplete messages. Leaving any half received messages in the buffer.
Protocols like kafka and cassandra achieve framing by including a message length in bytes in the header. This is great for Shotover since it means we can avoid parsing the entire message when its not needed. However Valkey does not have a header so we always need to parse the entire message to find out where it ends.
The ValkeyDecoder is an example of a Decoder implementation.
Lets step through the ValkeyDecoder implementation:
Framing is how a protocol defines where individual messages begin and end.
Reading a message
The first thing ValkeyDecoder::decode does is attempt to parse a Valkey message from the beginning of the bytes.
This is done by calling decode_bytes_mut from the redis-protocol crate.
There are a few possible return values:
- Failure to parse because the message is not fully received yet - in this case we return
Noneso that theFramedReadwill call us again when more bytes have been received. - Any other kind of parse error - we bubble up the error, eventually resulting in the connection being terminated.
- a message is successfully returned - we continue on and pass the message to the next stage.
- In this case the parsed message forms a structure of:
#![allow(unused)]
fn main() {
ValkeyFrame::Array(vec![
   ValkeyFrame::BulkString("SET"),
   ValkeyFrame::BulkString("foo"),
   ValkeyFrame::BulkString("bar"),
])
}
Constructing a Message
All messages in Shotover are stored in a Message type which is passed through each transform.
Message abstracts over all the different protocols supported by Shotover.
The ValkeyDecoder constructs a message by calling Message::from_bytes_and_frame_at_instant.
We pass in the raw bytes of the message and the parsed frame of the message, as well as a timestamp which is used purely for metrics.
Protocols with better framing mechanisms will use a different constructor to avoid parsing the whole request unless its really needed.
When the Message is created a new ID is generated and stored in the Message. This ID is a randomly generated 128bit integer used by transforms to match responses with their corresponding requests. This value is meaningful only within Shotover and is not part of the Valkey protocol.
Lets say in this example our message is assigned the ID 0xd12ac2704d19e53ef3fea94b4885c950.
ValkeyDecoder::decode then returns the Message to the caller.
The caller in this case being the tokio_util helper FramedRead.
Since the ValkeyDecoder runs on the read task the call stack is independent from the main call stack.
block-beta
    block:main["Call Stack\n\n\n\n\n\n\n"]
        columns 1
        space

        ValkeyDecoder
        FramedReader
        IncomingReadTask
    end
Codec to transform glue
The Message then goes through a few steps before it actually reaches a transform.
- The read task created by the Handler
- The message is read from the
FramedRead - The message is sent through a tokio channel
- This logic is specifically run in a separate task to enable decoding of incoming requests to run in parallel of any messages currently being process by transforms (calling tokio async code will execute on the same core unless a task is used)
- The message is read from the
- The Handler::run_loop method loops for the lifetime of the incoming connection and:
- Listens for requests from the read task over the channel
- If there are any requests, all pending requests are collected into a batch (
Vec<Message>) In our case the client is sending requests serially, waiting for responses each time. So this batch will contain only a single request. - Creates a ChainState.
ChainStatecontains all the chain level state accessed by transforms. This includes things like the batch of requests, the IP address and port the client connected to, a flag to allow transforms to force close the connection. Transforms are free to alter theChainStateand the next transform in the chain will receive the same alteredChainState. - Calls TransformChain::process_request passing it the
ChainState.
TransformChain::process_request:- Inserts the list of transforms in the chain into
ChainState - Calls
ChainState::call_next_transform
- Inserts the list of transforms in the chain into
- ChainState::call_next_transform:
- Pops the first transform from the list of transforms.
- Calls the transforms
transformmethod, beginning execution of the transform.
block-beta
    block:main["Call Stack\n\n\n\n\n\n\n"]
        columns 1
        space

        TransformChain
        ValkeySource
        IncomingConnectionTask
    end
Some Transform
The first transform in the chain begins executing. Most transforms look something like this:
#![allow(unused)]
fn main() {
    async fn transform<'shorter, 'longer: 'shorter>(
        &mut self,
        chain_state: &'shorter mut ChainState<'longer>,
    ) -> Result<Messages> {
        // iterate over all requests
        for request in &mut chain_state.requests {
            // each request is of type Message
            if let Some(Frame::Valkey(frame)) = request.frame() {
                // Calling `frame` on the request returns the parsed frame of the message.
                // This assertion is silly, but would pass for the example request we are working through
                assert_eq!(
                    frame,
                    ValkeyFrame::Array(vec![
                        ValkeyFrame::BulkString(Bytes::from_static("SET")),
                        ValkeyFrame::BulkString(Bytes::from_static("foo")),
                        ValkeyFrame::BulkString(Bytes::from_static("bar")),
                    ])
                );

                // At this point the transform is able to read and or rewrite the request as it pleases.
                // But for this example we will assume that no rewriting occurs.
            }
        }

        let mut responses = chain_state.call_next_transform().await?;

        for response in responses.iter_mut() {
            // do something with the responses
        }

        Ok(())
    }
}
At the point where call_next_transform is called, the next transform in the chain is popped from the list in ChainState and executed.
Execution of this transform asynchronously waits until the request is completely sent.
In the case of ValkeySinkCluster (the sink transform used in this example) call_next_transform will also block until a response for each request has been received. But that is legacy behavior that the other transforms do not have. So we will pretend that is not the case for the rest of this document.
block-beta
    block:main["Call Stack\n\n\n\n\n\n\n\n\n"]
        columns 1
        space

        SomeTransform["Some Transform"]
        TransformChain
        ValkeySource
        IncomingConnectionTask
    end
Another Transform
Another transform is called.
This is the same as the previous section.
However this time it pops the final transform from the list of transforms and executes it, in this scenario the final transform is ValkeySinkCluster.
block-beta
    block:main["Call Stack\n\n\n\n\n\n\n\n\n\n\n"]
        columns 1
        space

        AnotherTransform["Another Transform"]
        SomeTransform["Some Transform"]
        TransformChain
        ValkeySource
        IncomingConnectionTask
    end
ValkeySinkCluster sends request
The ValkeySinkCluster transform is quite complex so I will only describe it at a high level.
- For each request in
ChainState- Determine how to route the request via RoutingInfo::for_command_frame, in this case, since we are routing a
setwith key offoowe getRoutingInfo::Slot(hash_of(foo)). - Lookup the computed slot value against the list of Valkey nodes to find which Valkey node should handle this slot.
- Send the request to the Valkey node. A new outgoing connection is created if it does not exist yet.
- Determine how to route the request via RoutingInfo::for_command_frame, in this case, since we are routing a
Other functionality of ValkeySinkCluster not listed above includes:
- fetching and managing the metadata required for routing requests.
- working in either cluster hiding or cluster handling mode, the topology.yaml configuration defined earlier used hiding mode, so thats how our request is handled.
block-beta
    block:main["Call Stack\n\n\n\n\n\n\n\n\n\n\n\n"]
        columns 1
        space

        ValkeySinkCluster["ValkeySinkCluster Transform"]
        AnotherTransform["Another Transform"]
        SomeTransform["Some Transform"]
        TransformChain
        ValkeySource
        IncomingConnectionTask
    end
SinkConnection send
The standard way to form an outgoing connection is with SinkConnection
However, out of the 6 sink transforms that Shotover has currently, ValkeySinkCluster is the only sink transform not to use SinkConnection.
This is only for legacy reasons, so to give a better overview of Shotover, I'll be pretending that ValkeySinkCluster does actually use SinkConnection.
The SinkConnection type contains a single TCP connection and exposes an interface allowing the creator to send and receive Shotover Messages over the TCP connection.
When the SinkConnection is created it runs spawn_read_write_tasks which creates the tokio tasks for reading and writing to the outgoing connection.
In our scenario the transform called SinkConnection::send which sends a batch of requests to the writer task over a channel. The batch of requests contains just the one SET request.
The writer task then writes the message to FramedWrite which encodes the message to the TCP connection via ValkeyEncoder.
block-beta
    block:main["Call Stack (transform side)\n\n\n\n\n\n\n\n\n\n\n\n\n\n"]
        columns 1
        space

        SinkConnectionSend["SinkConnection::send"]
        ValkeySinkCluster["ValkeySinkCluster Transform"]
        AnotherTransform["Another Transform"]
        SomeTransform["Some Transform"]
        TransformChain
        ValkeySource
        IncomingConnectionTask
    end
block-beta
    block:main["Call Stack (write task side)\n\n\n\n\n\n\n"]
        columns 1
        space

        ValkeyEncoder
        FramedWriter
        SinkConnectionWriteTask
    end
Sink ValkeyEncoder
Earlier we talked about the Encoder and Decoder traits.
The ValkeyEncoder is an example of an Encoder implementation.
The logic for ValkeyEncoder::encode looks like:
- The into_encodable method is called on each request. This method returns the most efficient way to encode the request.
- Encodable::Frame - If the message is marked as modified by the transforms, the parsed valkey frame is returned, the encoder must reencode the bytes from the frame.
- Encodable::Bytes - If the message is not marked as modified, the raw bytes are returned and the encoder can simply write the raw bytes to the socket which is much faster.
In our example the request is unmodified so we take the fast path by directly writing the bytes.
You will recall that the original message was:
*3
$3
SET
$3
foo
$3
bar
That message is what is written out over TCP.
Additionally the sink ValkeyEncoder sends some metadata to its sink ValkeyDecoder counterpart.
Encoders and Decoders are always created in pairs allowing them to be assigned a shared channel at creation. This allows them to share state which is a requirement for working around stateful protocols.
The metadata sent to the ValkeyEncoder is a RequestInfo which tells the decoder:
- The request ID of the next response it will receive.
- In our case the ID was originally set to
0xd12ac2704d19e53ef3fea94b4885c950
- In our case the ID was originally set to
- The request type of the next response it will receive - Used to decide if
ValkeyDecodershould enter pubsub mode.- In our case it is a simple
SETrequest, so we are not entering pubsub mode.
- In our case it is a simple
block-beta
    block:main["Call Stack\n\n\n\n\n\n\n"]
        columns 1
        space

        ValkeyEncoder
        FramedWriter
        SinkConnectionWriteTask
    end
Transform chain unwinds
Since the request has been sent on the TCP socket, the ValkeySinkCluster transform has no more work to do, so it returns.
In turn the other 2 transforms also return as they have completed.
Finally we get back to the ValkeySource which waits for either:
- A new request to come in from the client.
- A new response to come in from Valkey.
Asynchronously waiting for one of multiple events is achieved via a tokio select macro.
block-beta
    block:main["Call Stack\n\n\n\n\n"]
        columns 1
        space

        ValkeySource
        IncomingConnectionTask
    end
Valkey Instance
The request is received by Valkey.
Valkey modifies its internal value of foo to contain bar and then sends back a success response.
The success response is encoded in RESP as:
+OK
Sink ValkeyDecoder
Now the ValkeyDecoder is used again, but this time its for decoding a response instead of a request. Parsing a response has a few extra complexities that we don't have to deal with when parsing a request.
As with the source ValkeyDecoder, the sink ValkeyDecoder follows the same steps:
- Receives the raw bytes of the response
+OK - Parses this into the frame
ValkeyFrame::SimpleString("OK") - Stores the raw bytes and frame of the response in a Message.
Then things deviate a bit.
- The
RequestInfofrom the sinkValkeyEncoderis received. - The request ID field of the response
Messageis set to0xd12ac2704d19e53ef3fea94b4885c950the ID stored in theRequestInfo
block-beta
    block:main["Call Stack\n\n\n\n\n\n\n"]
        columns 1
        space

        ValkeyDecoder
        FramedReader
        SinkConnectionReadTask
    end
SinkConnection receive
The ValkeyDecoder is driven by the SinkConnection read task.
The task waits for a response message to be successfully parsed from the TCP socket, once that occurs it will:
- Send the response to ValkeySinkCluster over the channel.
- Trigger the
force_run_chainNotifyto informValkeySourcethat it should run the transform chain as there is a pending response.Notifyis similar to a channel but carries no data, it is used only to await some kind of external event.- If we didn't notify the source about the pending response, the response would be stuck until the next request comes in, so
force_run_chainallows us to trigger the transform chain early to prevent stuck responses.
block-beta
    block:main["Call Stack\n\n\n"]
        columns 1
        space

        SinkConnectionReadTask
    end
Transform chain begins again
ValkeySource is notified of force_run_chain.
It calls the transform chain which calls the first transform, which calls the second transform, which calls ValkeySinkCluster.
The transform chain was called with 0 requests, which is what happens when a force_run_chain occurs when there are no pending requests.
In this case the transforms just iterate over the 0 requests in ChainState, resulting in nothing occurring.
Then the transform calls the next transform in the chain.
Until finally ValkeySinkCluster transform is called.
block-beta
    block:main["Call Stack\n\n\n\n\n\n\n\n\n\n\n\n"]
        columns 1
        space

        ValkeySinkCluster["ValkeySinkCluster Transform"]
        AnotherTransform["Another Transform"]
        SomeTransform["Some Transform"]
        TransformChain
        ValkeySource
        IncomingConnectionTask
    end
ValkeySinkCluster receives responses
ChainState contains no requests, so none are sent.
However ValkeySinkCluster does find that one of the outgoing SinkConnections has a pending response.
So that connection is queried for responses and ValkeySinkCluster includes the response in its return value.
block-beta
    block:main["Call Stack\n\n\n\n\n\n\n\n\n\n\n\n\n\n"]
        columns 1
        space

        SinkConnectionRecv["SinkConnection::recv"]
        ValkeySinkCluster["ValkeySinkCluster Transform"]
        AnotherTransform["Another Transform"]
        SomeTransform["Some Transform"]
        TransformChain
        ValkeySource
        IncomingConnectionTask
    end
The transform chain unwinds again
The transform chain unwinds again. However this time there is a response Message being returned by the called transform. Each transform now has an opportunity to inspect or rewrite the response.
Heres an example transform:
#![allow(unused)]
fn main() {
    async fn transform<'shorter, 'longer: 'shorter>(
        &mut self,
        chain_state: &'shorter mut ChainState<'longer>,
    ) -> Result<Messages> {
        for request in &mut chain_state.requests {
            // do something with the requests
        }

        let mut responses = chain_state.call_next_transform().await?;

        for response in responses.iter_mut() {
            if let Some(Frame::Valkey(frame)) = response.frame() {
                // Calling `frame` on the response returns the parsed frame of the message.
                // This assertion is silly, but would pass for the example response we are working through
                assert_eq!(
                    frame,
                    ValkeyFrame::SimpleString(Bytes::from_static("OK"))
                );

                // Calling `request_id` on the response returns the ID that was assigned to the request that this response is responding to.
                // Transforms can correlate requests to responses by calling `.id()` on requests and `.request_id()` on responses and comparing the results.
                //
                // This assertion is also silly, the id would be different every time.
                // But in this scenario that we are working through the request did in fact have this ID.
                assert_eq!(response.request_id(), Some(0xd12ac2704d19e53ef3fea94b4885c950));
            }
        }

        Ok(())
    }
}
Finally we get back to the ValkeySource which sends the response off to the source write task.
block-beta
    block:main["Call Stack\n\n\n\n\n"]
        columns 1
        space

        ValkeySource
        IncomingConnectionTask
    end
Source ValkeyEncoder
Same as the sink write task, the source write task drives FramedWrite and ValkeyEncoder.
The source ValkeyEncoder is the same implementation as the sink ValkeyEncoder:
- into_encodable is called and then the returned value is encoded.
- However the source
ValkeyDecoderdoes not need to worry about the request ID's or pubsub state, so there is no metadata sent to the sourceValkeyDecoder.
Since the response is not modified at all, the raw bytes are written to the TCP socket:
+OK
block-beta
    block:main["Call Stack\n\n\n\n\n\n\n"]
        columns 1
        space

        ValkeyDecoder
        FramedReader
        IncomingWriteTask
    end
The client receives response
The client receives the raw bytes +OK from the socket, parses it into "OK" and returns control back to the user since the request has succeeded.
Linux Specific setup
Building shotover
Shotover requires a single external dependencies to build on linux.
gcc must be installed due to the aws-lc-sys and ring crate containing some C code.
On Ubuntu you can install it via:
sudo apt-get install gcc
Integration test dependencies
Building and running integration tests and benchmarks requires many more external dependencies.
To set them up on ubuntu run the script at shotover-proxy/build/install_ubuntu_deps.sh.
Inspect the contents of the script to learn what it installs and why, some of the dependencies are optional, so feel free to skip those by installing the rest manually.
If you already have docker installed make sure it is not a rootless install, see install_ubuntu_deps.sh for more information.
macOS Specific Setup
Building shotover
There are no external dependencies required for building shotover on macOS.
Integration test dependencies
To run the tests capable of running on macOS, install the following dependencies:
brew install --cask docker
brew install openssl@3
brew install chipmk/tap/docker-mac-net-connect
sudo brew services start chipmk/tap/docker-mac-net-connect
You may need to enable the option Settings > Advanced > Allow the default Docker socket to be used (requires password) in Docker Desktop, and restart Docker Desktop, for docker-mac-net-connect to work.
Make sure that docker desktop is running when you run the tests.
To continue running tests after a reboot, you will need to rerun:
sudo brew services start chipmk/tap/docker-mac-net-connect